
Make Vertical Clips From a Horizontal Podcast


To make vertical clips from a horizontal podcast, convert each 16:9 moment to 9:16 with one of three methods: auto-reframe that tracks the active speaker, a manual crop you place by hand, or blurred bars that fit the whole frame inside the vertical with a soft fill top and bottom. Pick the method by footage type, one-person, two-person, or screen-share, not by habit.
That last sentence is the whole article. Most guides hand you one technique and call it done. The reason your clips look amateur isn't the tool, it's using a blurred-bar fill on a single-speaker monologue, or forcing a tight auto-crop on a two-person debate so half the conversation falls off-screen. Below is the decision matrix that maps each footage type to the right method, the usable-height math that explains why, and the steps to run it.
Why vertical conversion is non-negotiable
Your podcast is shot wide, but the platforms where clips get discovered are tall. Shorts, Reels, and TikTok are built for 9:16, and a 16:9 clip dropped into that feed shows up as a thin letterboxed strip in the middle of a phone, easy to scroll past. For video shows, clips drive a real share of growth: one studio's client data puts them at 20–40% of new audience, with 2–5× reach lifts (Podcast Studio Glasgow). That's a single-source range, not an audited guarantee, but the direction is clear, and none of that reach happens if the clip doesn't fit the screen.
There's a second reason the frame matters. Most social video is watched on mute, Digiday reported around 85% of Facebook video played without sound back in 2016 (Digiday, publisher-reported and directional). So a vertical clip has to carry the speaker's face and burned-in captions in the same tall frame. How you crop decides how much room is left for both.
The three ways to fit 16:9 inside 9:16
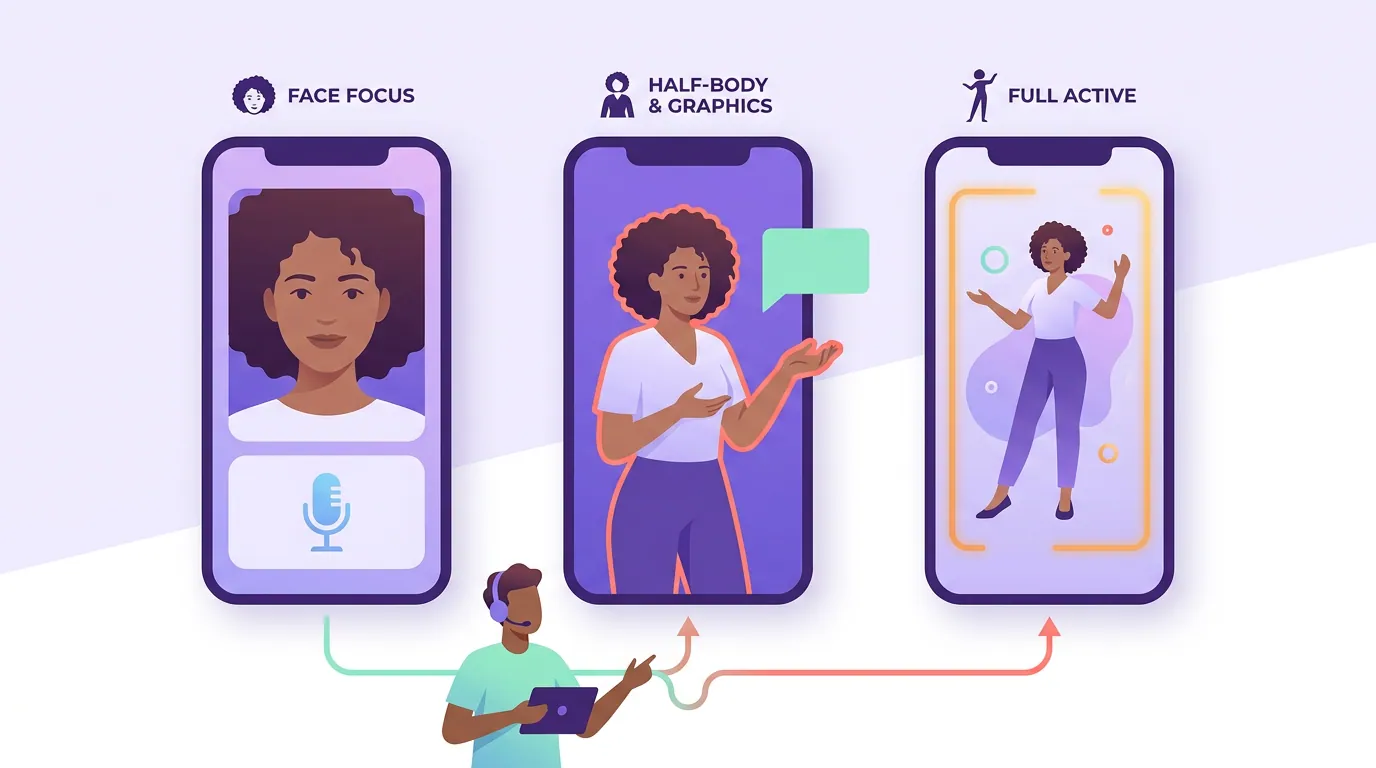
There are exactly three approaches to the conversion, and every tool, QuickReel included, is some combination of them. Here they are on the same wide frame.
Auto-reframe uses active-speaker detection to find who's talking and slides a 9:16 crop window onto that face, switching as the conversation moves. It fills the full vertical height and runs hands-off, which makes it the fastest path for a batch. The catch: it's reading signals, mouth motion, the audio channel, face position, and a gesture or a laugh can pull the crop onto the wrong person. If yours jumps to the silent listener, a misbehaving auto-reframe is fixable with a keyframe, not a re-export.
Manual crop is the same tall window, placed and moved by you. You decide where it sits and when it switches speakers. It gives the cleanest result and full height for the face, and it's the slowest, fine for a hero clip, painful across twenty.
Blurred bars (the "fit" or "padded" layout) shrinks the entire 16:9 frame until it spans the vertical's width, then fills the empty space above and below with a blurred, enlarged copy of the same frame. Nothing gets cropped out, so everyone stays in shot, but the actual video occupies only the middle third of the screen, leaving the face small.
The layout rule: footage type picks the method
Here's the part the other guides skip. The right method isn't a preference, it's a function of how many people are on screen and what they're doing. This is the matrix I run on every batch.
One person on screen → auto-reframe, or manual crop for hero clips. A solo host or a single-camera monologue is the easy case: there's only one face, so there's no contest for the tracker to lose. Auto-reframe nails it and you get full vertical height for the face plus room for captions. Reach for a manual crop only when a clip is going to carry a campaign and you want the framing exact.
Two people on one wide camera → auto-reframe with speaker switching, or a stacked split. When the camera is one wide shot of both hosts, auto-reframe that follows whoever's talking is right for a clean back-and-forth, it keeps the active speaker full-height and switches on the turn. But when both people talk over each other or one delivers a line the other reacts to, switching looks frantic. There, a stacked split (one face top, one face bottom) keeps both in frame and reads as a conversation. If your hosts were recorded on separate camera files, a Riverside recording gives you per-speaker tracks, the split is even cleaner because each face is its own clean source.
Screen-share, slides, or gameplay → blurred bars or a stacked layout, never a tight crop. When the value of the clip is on a shared screen, a demo, a chart, a game, cropping into it destroys the point. Use blurred bars so the full shared frame stays readable, or stack the screen-share on top with the speaker's webcam below. A tight auto-crop here is the single most common way a screen-share clip becomes useless.
How much screen each method actually gives the speaker
The reason "footage type picks the method" holds up is geometry. A 9:16 phone screen is tall; a 16:9 frame is wide. When you crop, you keep full height and throw away width. When you fit-with-bars, you keep full width and the video shrinks to the middle band. Here's roughly how much of the phone the speaker's face ends up occupying under each method.
The takeaway in one line: crop when one face carries the moment, fit-with-bars when the whole frame carries it. That's why a single-speaker monologue should never use blurred bars (you're shrinking a face for no reason) and a screen-share should rarely use a tight crop (you're hiding the thing people came for).
The steps, end to end
Once you know which method a clip needs, the workflow is the same path every AI clipper runs.
- Import the horizontal episode. Paste the URL or upload the file. The same import works whether the source is a YouTube podcast, a Zoom recording, or an audio-only episode where there's no video to reframe at all, you build a visual background instead.
- Generate and pick the moments. The tool transcribes and surfaces candidates; if you want to know why a given moment scored, how AI clip detection works breaks down each signal, and picking the best AI-suggested clips is the review rubric.
- Set the layout per clip using the matrix. Don't apply one layout to the whole batch. Tag each keeper as one-person, two-person, or screen-share, then assign auto-reframe, split, or bars accordingly.
- Check the reframe before you caption. Scrub each clip once and confirm the crop is on the talker (auto-reframe) and no face is cut at the jaw or forehead. This is faster than fixing it after captions are baked in.
- Caption, then export 9:16. Add burned-in captions placed in the safe zone, clear of the bottom UI, and export at 1080×1920. Set the caption style once for the batch.
Common mistakes converting horizontal to vertical
Using blurred bars on a single talking head. This is the lazy default in a lot of tools, and it shrinks a face that should fill the screen. If there's one person and one camera, crop.
Letting auto-reframe switch on every laugh in a two-person clip. A reframer running a face-by-face contest will lurch onto whoever gestures. For dense crosstalk, switch to a stacked split so both stay put. For a clean back-and-forth, auto-reframe is fine, but watch the turns.
Cropping into a screen-share. The shared content is the clip. A tight crop that catches half a slide makes the whole thing pointless. Use bars or a stacked layout and keep the screen whole.
Reframing before you trim. Set your in and out points first, then reframe, reframing a clip you later shorten is wasted work, and the speaker's position can shift across the cut.
Forgetting captions live in the same frame. A crop that pushes the face to the bottom third leaves nowhere safe for captions. Frame the face in the upper-middle so the lower band stays open for text.
FAQ
How do I turn a 16:9 podcast into a 9:16 clip? Convert each moment with one of three methods: auto-reframe that tracks the active speaker and crops to that face, a manual crop you place by hand, or blurred bars that fit the whole frame inside the vertical and fill top and bottom with a soft blur. Choose by footage type, one person, two people, or a screen-share.
Is auto-reframe or manual crop better? Auto-reframe is faster and right for most batches, especially one-person footage where there's no second face to confuse it. Manual crop gives exact control and is worth it for hero clips or busy multi-person scenes where the tracker keeps guessing wrong. Most workflows use auto-reframe as the default and switch to manual only when a clip earns it.
When should I use blurred bars instead of cropping? Use blurred bars when cropping would cut out something essential, a screen-share, slides, a chart, gameplay, or a group shot where everyone matters. Bars keep the full frame visible at the cost of a smaller picture. For a single speaker, skip bars and crop, so the face fills the screen.
How do I keep two people in frame for a vertical clip? For a clean back-and-forth, auto-reframe that switches to whoever's talking keeps the active speaker full-height. When both react at once or talk over each other, use a stacked split, one face top, one bottom, so neither drops out. Per-speaker camera files make the split cleaner.
What resolution should I export vertical clips at? Export 9:16 at 1080×1920 for Shorts, Reels, and TikTok. Keep captions inside the safe zone, clear of each platform's bottom interface, and confirm no face is cropped at the jaw or forehead before you publish.