
How to Run a 7-Day Clip Tool Trial

Run one source episode through every tool, score three things, captions, reframe, export, against a fixed rubric, and let the totals decide. Spread it across seven days so you test each tool on real work, not a demo. The whole point: you buy on evidence you can re-read in a spreadsheet, not on whichever tool you happened to try last.
Most clip-tool trials fail the same way. You sign up, generate a batch, glance at the previews, feel impressed or annoyed, and move on. A week later you cannot remember whether Tool A's captions were actually sharper than Tool B's or whether you were just in a better mood that afternoon. Recency bias picks your software. That is an expensive way to choose a tool you will run weekly.
This protocol fixes that. It is built for a buyer evaluating two or three tools at once, a podcast producer, an agency lead, or a marketing manager picking the stack a team will live in. If you only have time for one thing, do the controlled-input rule below. Everything else is refinement on top of it.
What does it mean to evaluate a clip tool trial properly?
Evaluating a trial properly means treating it like an experiment with one controlled variable. You feed every tool the identical source episode, score the outputs on the same rubric, and only let workflow and price break ties. Without a fixed input and a written scorecard, you are comparing your memory of three different afternoons.
The reason this matters more for clip tools than for most software: the outputs look alike at a glance. Most modern clippers surface a similar shortlist of obvious moments from an episode, the differences live in caption accuracy, how the reframe holds two speakers, and how few clicks sit between a finished clip and a posted one. The winner removes the most clicks, not the most "AI." Those differences are real and they compound across hundreds of clips a year, but they hide from a casual look. A rubric drags them into the light.
One more thing the casual trial misses: clips are not a vanity exercise. Social media now beats friends and family as the top way people find new podcasts, 57% of listeners cite social media versus 54% for friends and family, the first time social took the top spot (Coleman Insights & Amplifi Media, The State of Video Podcasting 2025, n=1,000 U.S. consumers, presented at NAB Show April 2025, via InsideRadio). The tool you pick in this trial is the one that feeds that channel every week. Worth an evening of rigor.
The controlled-input rule (the one thing you cannot skip)
Pick one source episode and use it for every tool. Same file, same length, same speakers, same audio quality. This is the whole experiment. Choose an episode that is representative, not your best one, a normal two-person interview with a few cross-talk moments, some laughter, one quiet stretch, and at least one segment with a name or technical term the captions can get wrong.
Why representative and not best: you want to see how each tool handles your typical Tuesday, not a cherry-picked highlight. If your show is usually three guests on a noisy Zoom, test that. A tool that nails a clean studio recording but mangles your real conditions will fail you in week two.
Export the same 10-minute window from that episode if the full file is long. Feed that identical window to each tool. Now any difference you see is the tool, not the input.
The 3-axis scorecard
Score every clip a tool produces on three axes, 1 to 5, then weight them. These three carry the decision; speed and workflow break ties.
| Axis | What you are scoring | A 5 looks like |
|---|---|---|
| Captions | Word accuracy, names/terms, timing, readability on a phone | Names and jargon correct, perfectly synced, easy to read muted |
| Reframe | Speaker tracking, faces in safe zone, no awkward crops | Both speakers framed, no cut-off chins, follows the talker |
| Export | Resolution, watermark, file cleanliness, aspect options | Clean 1080p+, no forced watermark, 9:16 / 1:1 / 16:9 available |
Caption accuracy deserves the heaviest weight because it is the most expensive thing to fix by hand and the most punishing when wrong, most social video is watched on mute, commonly cited at 75–85% (Sharethrough research put it at ~75%; Digiday reported ~85% of Facebook video muted in 2016, publisher-reported and directional). If the captions are wrong, the clip is wrong, and a viewer scrolling in silence never knows what your guest said.

The 7-day plan, day by day
Seven days is not busywork, it spaces the tools out so you judge each one on rested eyes, and it gives the free tiers room. Most clip tools, QuickReel included, run on a freemium model where the free credits cover roughly one episode, which is exactly one controlled run per tool. No card, no clock counting down.
- Day 1, Set up the control. Pick your representative episode, export the 10-minute window, and create the scorecard (a five-column spreadsheet: axis, weight, Tool A, Tool B, Tool C). Sign up for each tool's free tier. Do nothing else.
- Day 2, Run Tool A. Feed it the window. Generate a batch. Score the three best clips it produces on all three axes. Note time-to-first-clip and how many clicks from URL to a clip you would actually post.
- Day 3, Run Tool B. Same window, same scoring, same notes. Resist comparing to Tool A yet; score it on its own merits against the rubric.
- Day 4, Run Tool C (or rest). If you are down to two tools, use this day to re-watch Day 2 and Day 3 clips on your phone, muted, and re-score captions and reframe. Phone-muted is the real test.
- Day 5, The edit-effort test. Take the single best clip from each tool and finish it for posting, fix any caption error, adjust the crop, set the aspect ratio. Time it. In our own QuickReel benchmarking, a real batch from any AI clipper still needs human review on roughly a quarter to a third of clips (our internal observation, not a published figure). The tool that needs the least real editing wins this round.
- Day 6, The export-and-schedule test. Export each finished clip and try to get it to one platform. If a tool schedules directly to your platforms, note it. If it forces a watermark on the free tier, note that too, and check whether the paid tier removes it.
- Day 7, Tally and decide. Multiply each axis score by its weight, sum per tool, and read the totals. Then sanity-check the winner against price and the edit-effort timing from Day 5. The spreadsheet ranks; you confirm.
By Day 7 you have three scored clips per tool, real timings, and a written record. If someone on your team asks why you chose what you chose, the answer is a spreadsheet, not a shrug.
What the casual trial gets wrong
The vibes trial loses on three predictable counts, and naming them is the point of running the protocol instead.
First, different inputs. If you ran Tool A on a clean solo episode and Tool B on a messy three-guest one, you learned nothing comparable. Second, no record. Impressions decay within days; a 1-to-5 score in a cell does not. Third, the wrong dimension. People judge clip tools on the preview thumbnail and miss the thing that actually costs them time, caption fixes and re-crops, which only the Day 5 edit-effort test exposes.
There is an honesty caveat to carry into every trial: no AI clipper is "set and forget." Every one of them leaves a meaningful share of clips needing a human pass, as the Day 5 figure above shows. So the question is never "which tool is perfect," it is "which tool leaves me the least to fix." That is exactly what the Day 5 timing measures.
When the scores tie
If two tools land within a few points, break the tie in this order. Edit-effort first, whichever clip took less time to finish on Day 5 wins, because that cost repeats every week. Then workflow: direct scheduling to your platforms, brand templates you will reuse, language coverage if you publish in more than one. Then price, checked live on the vendor's page the day you decide.
Price is the last tiebreaker, not the first, and here is why: a tool that is a few dollars cheaper but adds ten minutes of caption fixing per clip is the more expensive tool once you count your time. Run the math on your real volume. A team shipping 40 clips a month feels edit-effort far more than a solo host shipping four. This is also where seat count and roles matter for a team, worth reading our note on what multi-seat clip tools should compare before you commit a whole team to a stack.
Adjusting the protocol for who you are
The default weights suit a general buyer. Tune them to your situation, because the right tool for a solo host is rarely the right tool for an agency.
- Solo podcaster: Bump captions and export, drop speed, you are not running volume, you are running consistency. See our breakdown for the best clip tool setup for solo podcasters and start with a single representative episode.
- Agency: Weight workflow and speed harder, you are billing time across many client shows, so clicks-per-clip and scheduling matter more than a one-point caption edge. Our guide to choosing a podcast clip tool for an agency walks the seat and white-label angles.
- In-house brand team: Weight brand templates and reframe, on-brand captions and consistent framing across a team are the whole job. Pair this trial with picking a clip tool for in-house brand teams.
Whatever you weight, keep the controlled input fixed. Change the weights, never the experiment.

Where QuickReel tends to land in this trial
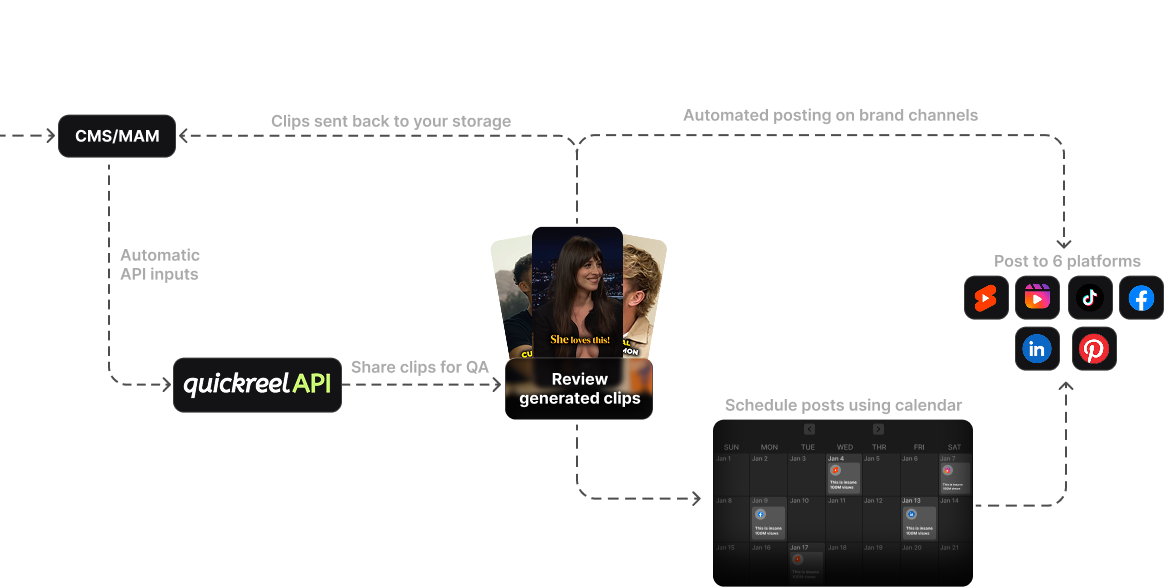
To be fair and specific: QuickReel usually scores well on captions and export in this rubric, caption accuracy across 20+ languages, clean exports without a forced watermark on paid tiers, and direct scheduling to many platforms, which earns workflow points on Day 6. The free tier gives you roughly one episode of credits, which is precisely one controlled run, so it slots into Day 2 cleanly.
Where it is not automatically the answer: if your single priority is the absolute cheapest per-clip price and you are happy doing more manual cleanup, a budget tool may out-score it on the price tiebreaker. And like every clipper, QuickReel still needs a human pass on some clips, the Day 5 test will show you exactly how much for your show. Run the protocol and let the totals decide; a tool that has to argue against a scorecard is not the tool you want.
If you want the full field of options before you build your shortlist, our tested roundup of the best AI podcast clip generators and the best Opus Clip alternatives in 2026 are the two lists to draw your two or three trial candidates from.
FAQ
How long should a clip tool trial actually take? Plan for seven days but only an hour or two of active work, one setup day, one run per tool, one edit-effort day, one export day, and one tally day. The week is for spacing, not labor. You can compress it to two focused days if you score with discipline and avoid judging tools back to back.
What should the test episode be? A representative episode, not your best one. Use a normal recording with your typical speaker count, audio quality, and at least one name or technical term the captions might miss. Export the same 10-minute window and feed that identical clip to every tool so the only variable is the software.
Which trial metric matters most? Caption accuracy, because most social video is watched on mute (commonly cited at 75–85%, publisher-reported) and caption errors are the most time-consuming thing to fix by hand. Reframe quality is second, especially for multi-guest shows. Export cleanliness and watermarks come third.
Do free tiers give me enough to run a real trial? Usually yes. Most clip tools run freemium with free credits covering roughly one episode, enough for exactly one controlled run, which is all the protocol needs. Check whether the free tier forces a watermark, then confirm the paid tier removes it before you decide on cost.
Should I pick the cheapest tool that passes? Only after counting your time. A cheaper tool that adds editing minutes per clip is more expensive at real volume. Use the Day 5 edit-effort timing to estimate your weekly cost, then let price break ties between tools that already scored close on captions, reframe, and export.